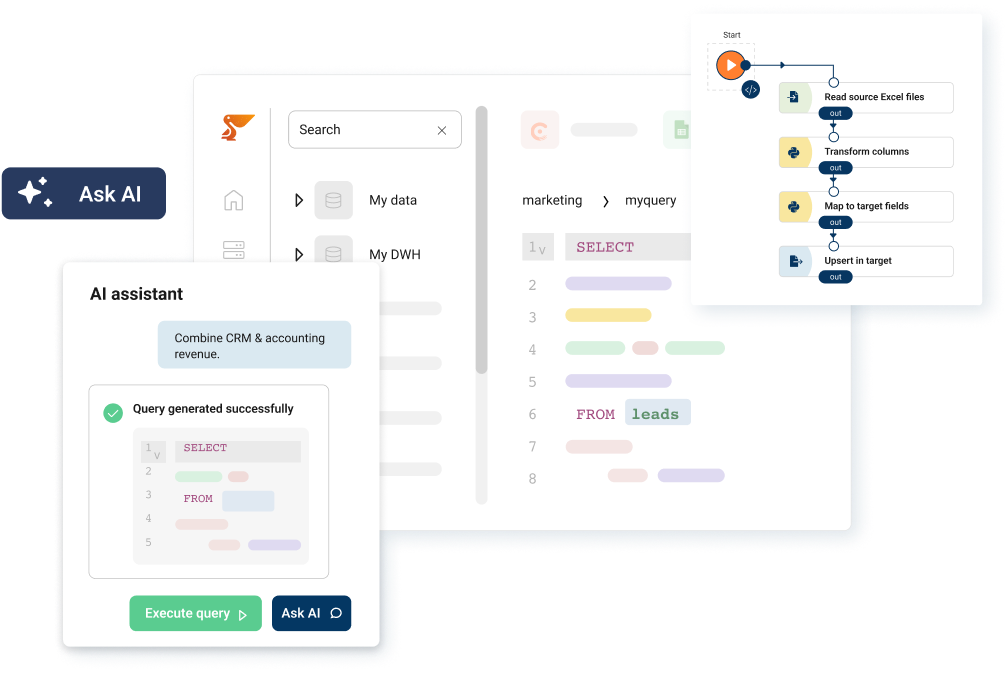


Claude, ChatGPT, and Cursor are powerful – but only as smart as the data they can reach. Most teams are still copying and pasting CRM screenshots into a chat window. In this post we build a real MCP server on Peliqan that gives any AI agent live, authenticated access to your business data – with writeback – in 30 minutes.
Your AI assistant can draft emails, summarise documents, and write code. What it cannot do – by default – is tell you why that enterprise deal went quiet, pull last week’s churn numbers from your warehouse, or update a HubSpot contact without leaving the chat.
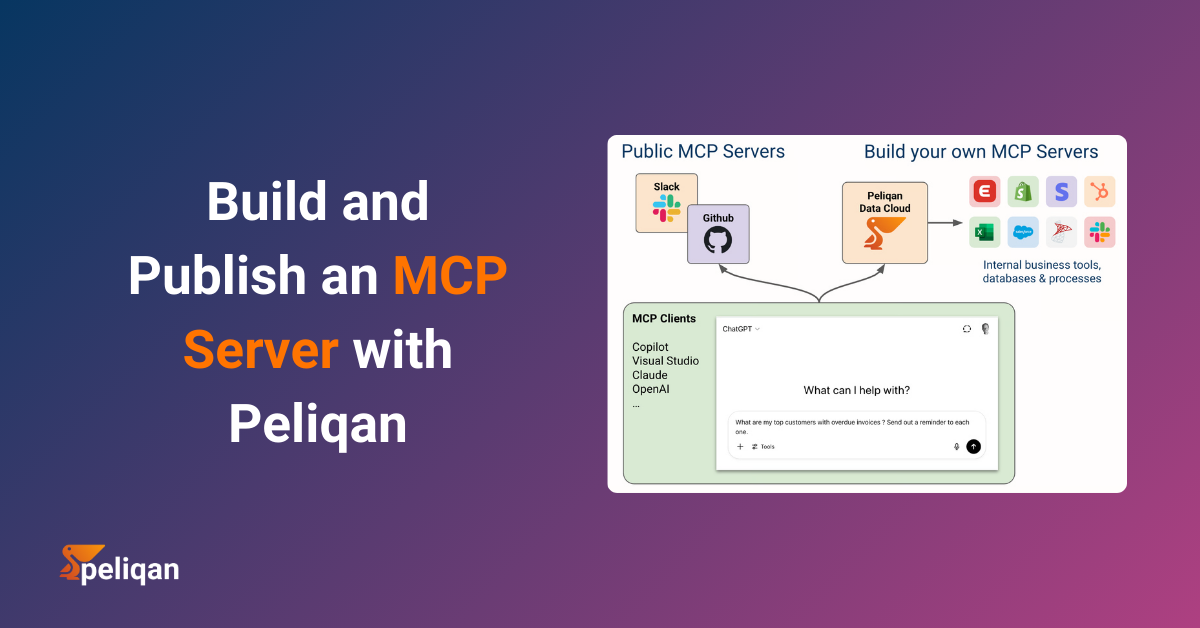
That gap is exactly what the Model Context Protocol (MCP) was designed to close. And Peliqan is one of the fastest ways to build a production-ready MCP server – because your data connections, warehouse, and Python runtime are already there.
In this walkthrough, we build a fully functional MCP server that exposes four tools to any MCP-compatible AI client:
- get_customer_health – live health score lookup from your data warehouse
- get_deals_at_risk – Salesforce deals with no activity in the last 14 days
- search_contacts – fuzzy contact search across HubSpot and your warehouse
- add_crm_note – write a note back to a HubSpot contact from the AI chat
By the end, you can open Claude Desktop and ask: “Which deals over $50k have gone quiet this month?” and get a live answer from your actual CRM and warehouse – not a hallucinated one.
What MCP Is – and Why Business Data Is the Hard Part
Model Context Protocol is an open standard, introduced by Anthropic in November 2024, that defines how AI applications connect to external tools and data sources. Think of it as a universal plugin system for AI – instead of every AI tool building bespoke integrations with every data source, MCP provides a single, standardised handshake.
An MCP server exposes three primitives:
- Tools – actions the AI can invoke (run a SQL query, update a CRM record, send a message)
- Resources – contextual data the AI can read (a company profile, a product catalogue, a policy document)
- Prompts – pre-built instruction templates that guide the AI toward specific behaviours
OpenAI adopted MCP in March 2025. Cursor, n8n, and every serious AI development framework now supports it. The ecosystem has crossed the threshold where building an MCP server is no longer experimental – it’s how production AI applications connect to business data.
The challenge is that most MCP tutorials show you how to expose a weather API or a todo list. Business data is different. It lives across a CRM, a data warehouse, an ERP, a payments processor – each with its own auth model, rate limits, and schema. Wiring all of that up from scratch takes days. Peliqan shortcuts that entirely, because the connectors and the warehouse are already there.
How Peliqan’s MCP Architecture Works
Two Ways to Run a Peliqan MCP Server
In both cases, the business logic lives in a Peliqan Data App – a low-code Python script that defines your MCP tools using the pq. module. Every tool can query your data warehouse, call any of Peliqan’s 250+ connectors, or write data back to a SaaS app – without managing credentials, tokens, or infrastructure.
Here is the full architecture of what we’re building:
Claude Desktop (stdio) ──────────────┐
Cursor IDE (stdio) ──────────────────┤
n8n AI Agent (HTTP) ─────────────────┤──> mcp-server-peliqan (local proxy)
Custom chatbot (HTTP/SSE) ───────────┘
POST /mcp ──> API Handler Data App (Python)
├── get_customer_health() pq.read_sql() on DWH
├── get_deals_at_risk() pq.connect(‘Salesforce’)
├── search_contacts() Trino federated query
└── add_crm_note() pq.connect(‘HubSpot’).add()
Step 1 – Prerequisites: Your Data Sources in Peliqan
Before building the MCP server, you need your data sources connected in Peliqan. If you followed our post on vibe coding a full ELT pipeline, you already have HubSpot and Salesforce wired up. If not, go to Data Sources > Add Connection and connect:
- HubSpot (OAuth) – contacts, companies, notes
- Salesforce (OAuth) – accounts, opportunities, activities
- Your data warehouse – built-in Peliqan DWH, or bring your own Snowflake, BigQuery, or Postgres
All three connections are available to every Data App you write – no credentials to pass, no connection strings to manage. The pq.connect('HubSpot') call resolves to the authenticated connection you configured here.
Step 2 – Build the MCP API Handler in Peliqan
In Peliqan, navigate to Build > Apps > New App. Select the MCP template to get the scaffolding pre-filled, then write your tool logic. Here is the complete API handler for all four tools:
# Peliqan MCP API Handler
# Route: POST /mcp   (configured in the API endpoint settings)
# pq module is auto-available - all connected sources accessible via pq.connect()

import json

# Peliqan calls handle_request() with the parsed MCP request body
def handle_request(request):
    method = request.get("method")

    # ── MCP handshake: tell clients what tools are available ──────────
    if method == "tools/list":
        return {
            "tools": [
                {
                    "name": "get_customer_health",
                    "description": "Returns the current health score, MRR, and churn segment for a customer",
                    "inputSchema": {
                        "type": "object",
                        "properties": {
                            "email": {"type": "string", "description": "Customer email address"}
                        },
                        "required": ["email"]
                    }
                },
                {
                    "name": "get_deals_at_risk",
                    "description": "Lists Salesforce deals with no activity in the last N days",
                    "inputSchema": {
                        "type": "object",
                        "properties": {
                            "days_inactive": {"type": "integer", "description": "Inactivity threshold in days", "default": 14},
                            "min_value":     {"type": "number",  "description": "Minimum deal value in USD"}
                        }
                    }
                },
                {
                    "name": "search_contacts",
                    "description": "Searches contacts by name or email across HubSpot and the data warehouse",
                    "inputSchema": {
                        "type": "object",
                        "properties": {
                            "query": {"type": "string", "description": "Name or email fragment to search for"}
                        },
                        "required": ["query"]
                    }
                },
                {
                    "name": "add_crm_note",
                    "description": "Adds a note to a HubSpot contact record",
                    "inputSchema": {
                        "type": "object",
                        "properties": {
                            "email":   {"type": "string", "description": "Contact email address"},
                            "note":    {"type": "string", "description": "Note content to add"}
                        },
                        "required": ["email", "note"]
                    }
                }
            ]
        }

    # ── Tool execution ────────────────────────────────────────────────
    if method == "tools/call":
        tool_name = request["params"]["name"]
        args      = request["params"].get("arguments", {})
        return dispatch(tool_name, args)

    return {"error": f"Unknown method: {method}"}


def dispatch(tool_name, args):
    if tool_name == "get_customer_health":
        return get_customer_health(**args)
    elif tool_name == "get_deals_at_risk":
        return get_deals_at_risk(**args)
    elif tool_name == "search_contacts":
        return search_contacts(**args)
    elif tool_name == "add_crm_note":
        return add_crm_note(**args)
    return {"error": f"Unknown tool: {tool_name}"}
Step 3 – Write the Tool Logic with pq.
Each tool is a regular Python function that uses the pq. module to query or write data. Add these below the handler above in the same Data App:
Tool 1 – get_customer_health
def get_customer_health(email: str):
    """Query the customer_health_score view built in the ELT pipeline."""
    df = pq.read_sql(f"""
        SELECT
            email,
            health_score,
            health_segment,
            mrr,
            active_days,
            features_used,
            scored_at
        FROM customer_health_score
        WHERE LOWER(email) = LOWER('{email}')
        ORDER BY scored_at DESC
        LIMIT 1
    """)

    if df.empty:
        return {"content": [{"type": "text", "text": f"No health score found for {email}"}]}

    row = df.iloc[0]
    summary = (
        f"Customer: {row['email']}\n"
        f"Health score: {row['health_score']:.1f} / 100  ({row['health_segment'].replace('_', ' ').title()})\n"
        f"MRR: ${row['mrr']:,.0f}\n"
        f"Active days (last 30): {int(row['active_days'])}\n"
        f"Features used: {int(row['features_used'])}\n"
        f"Last scored: {row['scored_at'].strftime('%Y-%m-%d')}"
    )
    return {"content": [{"type": "text", "text": summary}]}
Tool 2 – get_deals_at_risk
def get_deals_at_risk(days_inactive: int = 14, min_value: float = 0):
    """Fetch Salesforce opportunities with no recent activity."""
    sf = pq.connect('Salesforce')

    # Use Peliqan's Salesforce connector to query opportunities
    deals = sf.query("""
        SELECT Id, Name, Amount, StageName, LastActivityDate, Account.Name
        FROM Opportunity
        WHERE IsClosed = false
          AND (LastActivityDate = null OR LastActivityDate < LAST_N_DAYS:{days}) ORDER BY Amount DESC NULLS LAST LIMIT 25 """.replace("{days}", str(days_inactive))) if not deals: return {"content": [{"type": "text", "text": f"No at-risk deals found (inactive {days_inactive}+ days)"}]} filtered = [d for d in deals if (d.get('Amount') or 0) >= min_value]

    lines = [f"Deals inactive for {days_inactive}+ days (min value ${min_value:,.0f}):\n"]
    for d in filtered[:10]:
        last_activity = d.get('LastActivityDate') or 'Never'
        lines.append(
            f"- {d['Name']} ({d['Account']['Name'] if d.get('Account') else 'Unknown'})\n"
            f"  Stage: {d['StageName']}  |  Value: ${d.get('Amount', 0):,.0f}  |  Last activity: {last_activity}"
        )

    return {"content": [{"type": "text", "text": "\n".join(lines)}]}
Tool 3 – search_contacts (Trino Federated Query)
def search_contacts(query: str):
    """
    Search contacts across HubSpot and the warehouse in a single Trino query.
    Trino lets us JOIN live sources without moving data - no prior sync needed.
    """
    df = pq.read_sql(f"""
        SELECT
            h.email,
            h.firstname || ' ' || h.lastname   AS full_name,
            h.company,
            h.phone,
            h.hs_lead_status                    AS lead_status,
            hs.health_score,
            hs.health_segment
        FROM hubspot.contacts h
        LEFT JOIN customer_health_score hs ON LOWER(h.email) = LOWER(hs.email)
        WHERE
            LOWER(h.email)     LIKE LOWER('%{query}%')
            OR LOWER(h.firstname || ' ' || h.lastname) LIKE LOWER('%{query}%')
            OR LOWER(h.company) LIKE LOWER('%{query}%')
        ORDER BY hs.health_score DESC NULLS LAST
        LIMIT 10
    """)

    if df.empty:
        return {"content": [{"type": "text", "text": f"No contacts found matching '{query}'"}]}

    lines = [f"Contacts matching '{query}':\n"]
    for _, row in df.iterrows():
        score_str = f"{row['health_score']:.0f}/100 ({row['health_segment']})" if row['health_score'] else "no score"
        lines.append(
            f"- {row['full_name']} <{row['email']}>\n"
            f"  Company: {row['company'] or 'N/A'}  |  Status: {row['lead_status'] or 'N/A'}  |  Health: {score_str}"
        )

    return {"content": [{"type": "text", "text": "\n".join(lines)}]}
Tool 4 – add_crm_note (Writeback)
def add_crm_note(email: str, note: str):
    """Write a note back to a HubSpot contact - from inside the AI chat."""
    hs = pq.connect('HubSpot')

    # Look up the contact ID first
    contact = hs.get('contact', filter={'email': email})

    if not contact:
        return {"content": [{"type": "text", "text": f"Contact not found for email: {email}"}]}

    # Add the note via Peliqan's HubSpot writeback connector
    hs.add('note', {
        'associations': [{'id': contact['id'], 'type': 'contact'}],
        'body':         note,
        'timestamp':    pq.now_ms()
    })

    pq.log(f"Note added to HubSpot contact {email} via MCP")
    return {"content": [{"type": "text", "text": f"Note added to {email}'s HubSpot record."}]}
⚠️ Treat Writeback Tools with Care
Any tool that modifies data – adding notes, updating fields, sending messages – should be scoped carefully. In Claude Desktop, the AI will ask for confirmation before calling a writeback tool. In automated agent pipelines (n8n, LangChain), add explicit approval steps. Peliqan’s run logs capture every tool invocation with timestamp, arguments, and result – so you always have a full audit trail.
Step 4 – Publish the API Endpoint
With the Data App written, navigate to Build > API Endpoints > New Endpoint and configure:
- Route:
/mcp - Method: POST
- Script: select the API handler Data App you just wrote
- Authentication: API token (Peliqan generates one per endpoint)
Hit Publish. Your MCP server is now live at https://app.peliqan.io/api/your-account/mcp.
Step 5 – Connect Claude Desktop (or Any MCP Client)
Peliqan provides a lightweight local proxy package that bridges the stdio transport Claude Desktop uses to your remote Peliqan API. Install it once:
pip install mcp-server-peliqan
Then add Peliqan to Claude Desktop’s MCP configuration file. On Mac this lives at ~/Library/Application Support/Claude/claude_desktop_config.json, on Windows at %AppData%\Claude\claude_desktop_config.json:
{
  "mcpServers": {
    "peliqan": {
      "command": "python",
      "args": ["-m", "mcp_server_peliqan"],
      "env": {
        "peliqan_account_id": "1234",
        "peliqan_api_token":  "your-api-token-here"
      }
    }
  }
}
Restart Claude Desktop. The tool panel now shows your four Peliqan tools – get_customer_health, get_deals_at_risk, search_contacts, and add_crm_note – ready to call against your live business data.
🔗 Connecting Other MCP Clients
Seeing It in Action
Once connected, here are real queries you can run against your business data – with live answers from your warehouse and CRM:
💬 Example Conversations with Claude
Claude: calls get_deals_at_risk(days_inactive=21, min_value=50000) – returns live Salesforce data
Claude: calls search_contacts(“Acme”) to find the email, then get_customer_health(email) for the score
Claude: asks for confirmation, then calls add_crm_note – the note appears in HubSpot within seconds
The key difference from a standard LLM response is that these answers come from your actual CRM and warehouse – not from training data, not from hallucination. Claude is doing the reasoning; Peliqan is doing the data access.
Updating Your MCP Server Without Touching Client Config
One of the biggest advantages of hosting your MCP logic in a Peliqan Data App rather than a locally-installed package: updates happen server-side.
When you add a new tool, fix a query, or change a schema, you edit the Data App in Peliqan and hit Save. Every MCP client connected to your /mcp endpoint gets the new tools on their next tools/list call – no reinstalls, no config changes, no restarting local servers across every developer’s machine.
This is particularly valuable in team environments. Your revenue ops team, customer success team, and engineering team can all point their AI tools at the same Peliqan MCP server, and the data engineering team controls what tools are available and what data each tool can access.
Production Considerations
🔒 Security and Governance Checklist
Generate separate Peliqan API tokens per client (Claude Desktop, n8n, Cursor) - revoke individually if neededFilter SQL queries by team or role inside the tool logic - e.g. only return deals owned by the requesting userEvery pq.log() call and every API endpoint hit is captured in Peliqan's run history with timestamp and argumentsPeliqan is SOC 2 Type II certified and GDPR-compliant with data centres in Europe - data never leaves your Peliqan accountWhat You Can Build From Here
Four tools is a starting point. The same pattern – pq. function in a Data App, published as a tool on the /mcp endpoint – scales across any business domain Peliqan is connected to.
🛠 More MCP Tools You Can Add in Minutes
- get_invoice_status – query open invoices from your accounting system (Xero, QuickBooks, Exact)
- get_support_tickets – pull open Zendesk or Freshdesk tickets for a customer
- run_sql – a general-purpose tool that executes any approved SQL query against your warehouse
- create_deal – create a new Salesforce opportunity from inside a conversation
- send_slack_message – post to a Slack channel from the AI agent
- semantic_search – RAG search over your unstructured data using Peliqan’s built-in vector store
Each of these follows exactly the same pattern: a Python function using pq.connect() or pq.read_sql(), registered in the tools/list response, dispatched in the tools/call handler. If you can write a pq. function, you can expose it to any AI agent in the world.
For teams building AI agents with n8n, the Peliqan AI page covers how to wire Peliqan MCP tools directly into n8n workflows with RAG and Text-to-SQL capabilities alongside standard tool calls.
Conclusion
MCP has crossed the adoption threshold. Claude Desktop, Cursor, n8n, OpenAI’s tools – they all speak it. The question is no longer whether to build an MCP server, but how quickly you can connect it to your actual business data.
The pattern we built today – Peliqan Data App as the tool logic, /mcp endpoint as the server, mcp-server-peliqan as the client bridge – is production-ready, secure, and updatable without touching client config. You get live CRM lookups, warehouse queries, and writeback in the same interface you already use to talk to your AI.
The hardest part of building an AI agent that knows your business is the data layer. With Peliqan, that layer is already there – you just need to tell it what to expose.
Try Peliqan free and publish your first MCP server today. The full MCP documentation and setup guide are at help.peliqan.io, and the open-source client proxy is on GitHub.